
Instagram is the second-most-downloaded free app and millions of photos and videos are uploaded in a single day. It’s an overflowing sea of content. While the average person couldn’t care less if anyone besides family and close friends see their pics, it’s a different story for social media influencers. If you factor in how much money influencers can earn from sponsored content, it makes sense that their content needs to stand out.
And one way influencers set themselves apart from the rest is by creating a cohesive or visually appealing feed that followers can connect with and automatically recognize. After the photos are snapped, but before they’re posted to the grid, the process of editing has to take place. And that’s where the real magic can happen. From the ease and consistency of presets to painstakingly editing out background images, three influencers share their process behind editing a pic that’s worthy of their Instagram grid.
With more than a decade of experience as a photographer and content creator, Phoenix-based influencer Denisse Myrick has her editing process down to a science. A quick one.
Though she photographs others, Myrick also steps in front of the camera for her 35,000-plus following on Instagram. She describes her vibe as “clean” with a love for earth tones. Her not-so-secret secret is presets, which are popular with a lot of influencers. A specific preset or filter can be applied to a variety of photos so they all have a cohesive look. But the added bonus is it’s a timesaver.
“Creating presets has cut down on my editing time by a bunch. My workflow is pretty quick. Where it would take me 4-5 minutes to edit a photo or find the right tones, it now takes me a minute per photo because I’ve created a preset for every one of my styles.” And she not only uses presets but she also sells them on her site, Chasing Denisse. They were specifically created for people of color so they can “have a cohesive look without compromising the integrity of their melanin on screen” and making them look “fake.”
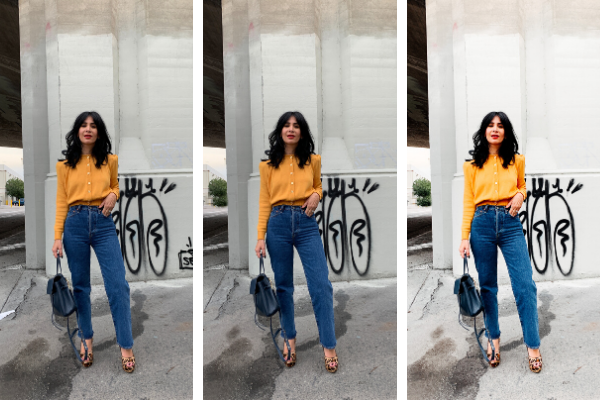
For this particular photo, Myrick, who says she can edit some photos in as little as 40 seconds, had a pretty simple process. Her goal for the photo? “I wanted to make it look a little more like spring, even though it’s winter.” So she applied a warm preset and then tweaked the temperature to make the photo warmer and upped the contrast. Because Myrick describes her preset as “pretty spot on,” this photo required little work.
Myrick usually edits 90% of her photos on desktop using photo-editing software Adobe Lightroom, but for those quick edits on the go, she calls VSCO her “day one.”
Like Myrick, Annette Vartanian of A Vintage Splendor also uses presets for all of her photos, but her editing process is a bit more involved.
Her trio of go-to editing apps is Lightroom, VSCO and Retouch. Many of Vartanian’s photos have bold colors or patterns and she applies a bit of grain, which she says “adds just enough texture so the image has that vintage look without looking dated. It also helps for images taken in low light on the iPhone as it can hide slight blurriness.”
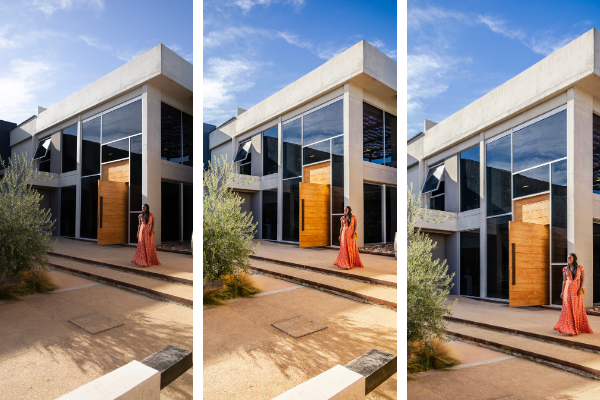
For this recent photo on her feed, snapped by her husband using the iPhone XS, the background proved a bit challenging. Presets can be a timesaver, but they don’t do all the work. Vartanian shared that this photo took about 15 minutes to edit from start to finish. “Most of the time was spent retouching the trash without compromising the quality of the photo.”
The first major step was using Retouch to clean up the sidewalk and remove trash. “I like to keep it real,” Vartanian said. “But no one needs to see a cute outfit with a side of trash.” Next was incorporating her presets in Lightroom, which are meant to adjust exposure, contrast, highlights and shadows.
“I then lowered the ‘blacks’ to make the image pop. I find this is important since I have dark hair and wear a lot of color and prints.”
The final steps for Vartanian’s photo included slightly lowering the saturation and increasing exposure so the color of the sweater and her skin look more natural. Keeping the vintage vibe going, she added a touch of grain and the final step was sharpening the image.
Alicia T. Chew joined Instagram in 2013 as a way to promote her travel and lifestyle blog, Alicia Tenise. She goes through about as many steps as Vartanian, but Chew enlists the help of others.
The D.C.-area blogger’s past editing style included using the filters in VSCO and Afterlight, another photo-editing app, but they weren’t cutting it. “I noticed that the filters that came with the app didn’t really flatter my skin tone very well, so I decided to stop relying on mobile apps and started to teach myself the ins and outs of Adobe Lightroom.”
Her current process, which she started around 2017, looks a bit different. After shooting with her photographer, Chew makes her top 10-15 selections and then the photographer uses Lightroom to apply “global edits” where exposure and saturation are adjusted. If any further adjustments are needed, she outsources the job to an overseas retoucher for $16 an hour. Chew makes it clear the retoucher only edits the surrounding environment of the photo, not her hair, face or body.
For the photo shown above, global edits were applied. Next, the photo was cropped vertically and the perspective was adjusted to straighten the building. The rest of the work was completed by the retoucher, who Chew instructed to “clean up the bush, the concrete of the building and to clean up the flooring on the lower right hand side of the photo.”
In total, the time spent to edit this single photo was 3 hours and 2 minutes, with her photographer only needing two of those minutes and the crux of the work performed by the retoucher.
All of the women agree their edited photos don’t perform any differently than those that require minimal or heavier edits.
Ironically, Chew’s top performing photo of 2019 was snapped on an iPhone. “As much as people love heavily edited work, I think sometimes it’s good to inject a more ‘real’ photo here and there.”